My Sons Room Re-Do Ideas

In January one my of my Project List goals was to create a mood board from my son’s bedroom re-do, January proved to be a busy month and I never had a chance to create one. Now that its' almost February I thought I better get started on his room plans! Even though his room re-do is a few months off, I like to plan ahead. Over the past month I've scored some great finds for his room, see I have been working on it.

My son is 9 years old - So I have to create a perfect balance between adolescence and impending tween years this year he's turning 10! Whoa he'll be in double digits soon. When we bought our house last year I made the huge mistake of painting his room and awful blue shade - I thought I was getting a more mature blue - Um NO, it was a scary baby blue on all 4 walls! Defeated, I left his room untouched for a over a year. Now I've come up with a new color palette that I think he'll enjoy for a while, most importantly he approves.

The Room Plan


My Objective:
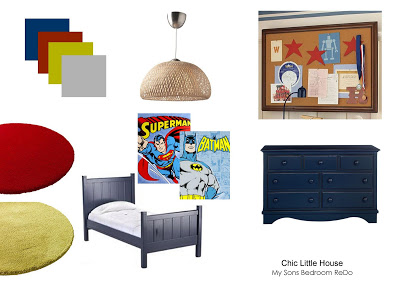
  •  Color Palette: Gray Walls, Navy Blue dresser & Accents, Cranbery Red, Bedframe & desk and Accents, Limey Pear Accents (I really like this color with the grays, reds and blue, it adds more interest to the room). I will update this with the name colors soon.
  •  Lighting: I really like the woven pendant light from Ikea, I like that it will provide a layer of of texture my sons room and its COOL. However if it proves to be way to large, I will go a DIY route use a large bamboo drum shade instead.
  • Organizing: I like this Cork board from Pottery Barn, however at $ 179.99 it’s not in the Budget. I will DIY a large corkboard for his room to hang over his desk. I will also use soft bins for storage for his legos, toys etc.
  •  Area Rug: Instead of using one large area rug to cover the floors, I plan on using these round area circles from Ikea in blue, red and limey pear. For only $ 9.99 this is a great affordable option.
  • Clothes Storage: While I love this option from Land of Nod (Crate & Barrel Kids); I plan on browsing Craigslist hoping to score a great deal on smaller dresser, like I did for my bedroom. The dresser will play double duty and also be used to hold his TV.
  • Study Time: A few months ago we found a great desk for $10 bucks on Craigslist, in need of a little love and paint. I plan on painting his desk red and updating the hardware. I will also be on the lookout for the perfect work lamp so he has plenty of light to do his homework.
  • His Bed & Bedding: I plan on using is current bed frame, I bought the bed frame from Salvation Army a few years ago and nicely updated it with Red paint, lucky for me it works with his Color Palette. In December I found the perfect bedding at JC Penny's for a steal! His current nightstand while ok - will be updated with a new - again hoping Craigslist Comes though for me.
  • Artwork: My son's a little artist; I plan on framing his favorite drawings and paintings with white Ikea Frames. I love the large selection of frames in various sizes and they have AND at great prices. I will also buy a few Hero (Superman & Batman) pictures and frame them as well, of course he'll have final approval on all pictures!  
I'm so looking forward to re-doing his room, and he is too. He told me the other night, "Mom, I don't like my bedroom wall color." Of course I'll post his room before picturses very soon, just need to him to pick up his legos off the floor!

How To: Make Your Baseboards TallER

When we moved into our home in January 2009 - all of all baseboards were a honey oak color. We quickly got to work and painted our baseboards a bright glossy white. The bright glossy white baseboards really helped our wall colors look like there more true color. When we started to tear up the tile in our dining room and kitchen, my husband carefully removed our baseboards. Of course during the removal got dinged and I knew after we reinstalled them I would have to repaint them, which got me thinking. Even though we had nice baseboards, they are the standard 3" they looked kind of blah. One thing I love about older homes is the character and I wanted to add more character to our excising baseboards. I decided the first room to tackle would be our dining room - perfect timing since we installed new dark faux wood floors.


Here's what we did. I made a couple of trips to Home Depot and Lowes looking for the perfect piece of molding to give extra oomph to our baseboards. I came across a piece of molding at Lowes birch wood already primed that looked to be the exact depth of our current baseboards. I bought one piece and put it up against our molding and it looked perfect! I made a trip back to Lowes and picked up three more pieces of molding for our dining room.


Tools Needed

Miter Saw or Miter Saw Box
Caulk
New Moldings
Nail Set
Nails - We used panel nails (you can also use liquid nails)


Step One:

Line up your new molding with your old molding, mark for your mitered cuts (corners). We used a miter saw (we got one for easy cuts for our flooring we installed). We picked up from Sears at a great price $99.00 on sale, and it even comes with a laser track to make all our cuts smooth. We also changed our blade to a finish blade so all the wood pieces we cut will be nice and smooth, this is important!

Step Two:

After all the miter cuts were made, I placed my new molding on top of the excising one and began to nail the molding into the wall. I spaced my nails about 16 inches apart. Next I used a nail set and - and sank each nail into the molding, so it’s no longer sticking out

See that top piece, thats off white? Yup that's the new molding laying on top the old molding


Me, hammering in the new new moudling


Step Three:


I caulked like crazy. I caulked the seams where the two pieces of baseboard met, and then I topped the caulk. Next I caulked all the nail holes and smoothed out the caulk using my fingers. I caulked the heck out of our mitered corners. Let that caulk dry! We have the slow drying caulk - so I had to wait two whole hours - which felt like a lifetime, so I watched a cheesy Lifetime movie.

Step Four:

After all the caulking was done, I light sanded the new and old baseboards, and wiped away any dust - the old baseboards were pretty roughed up after they were removed them, so a light sanded would make my coats of paint nice and smooth. Next I taped off the baseboards top and bottom (yes I used the cheapo painters tape, but it works!) Next up priming the baseboards - Even the top 'new' baseboards were primed and went ahead and primed them again. I waited an hour for the primer to dry and then painted the baseboards a bright glossy white.

See, they needed a light sanding and primer


Two coats of paint later much better


** Please note I also added quarter round molding to the bottom of the baseboards, since we installed faux wood floors you leave a small gap between the wall and the floor for expansion and contraction. It proved too tricky for me to use nails on the quarter round molding. So  instead I used wood glue and applied it on the baseboards, let it to dry and then caulked the heck out of it - looks perfect! **

Step Five:


Take a step back admire your work! You did an awesome job. I love how the white baseboards really contrast lovely with the flools and our wall color.


I did the entire project myself except for the mitered cover cuts – next time I’ll do those solo.  This is an easy DIY project. Next up - I'm going to make all our baseboards tallER! And of course now that we are the proud owners of a miter saw, we will be DIY Crown Molding!

Project Cost:

Top molding $ 17.46 (@ $4.44 dollars each)
Quarter Round molding $ 17.46 (@ $4.44 dollars each)
Box of Panel Nails $ 1.79
Nail Set $ 1.99
DAP Caulk - Had on Hand
Zinsser Primer - Had on Hand
Valspar Glossy White Paint - Had on Hand
Total: $ 39.30


Tall molding that add character - Priceless


Have you added height to your existing baseboards? Will this be added to your To Do list?