
I bought my first used piece of used furniture years ago, a little piano bench I recovered 2x and eventually repainted you can see my original post about it here. At the time didn't give much thought about the condition of the piece, I just like the lines. Luckily for me it was in good shape and I had no issues. But when buying a used piece of furniture especially a dressers, you have to dig a little deeper to make sure its a solid piece you love and that's worth your time and energy if you plan on re-finishing or painting. If your a long time reader of my blog than you remember I bought Tabari three desks, one was a dud! The second one was perfect for my nephews bedroom and finally the third dresser was a charm. You can see his refinished desk here. I've also made a mistake when looking for Avery's dresser, I found a great dresser (style-wise) but, not in good shape and I thought I could make it pretty, yeah that didn't happen. It had bad chipping veneer, not cute.
Its taken me a a few trial and errors to know what a well made dresser really is. I thought I would share my tips after I recently came across a little dresser I loved on Craigslist, but only to realize in person it had issues. Even with its issues, it was tough for me to pass up. If you follow me on Instragram { @mrsclh } then you may have seen my picture of the dresser and read my disappointment. I'll get to more on that little dresser in a bit.
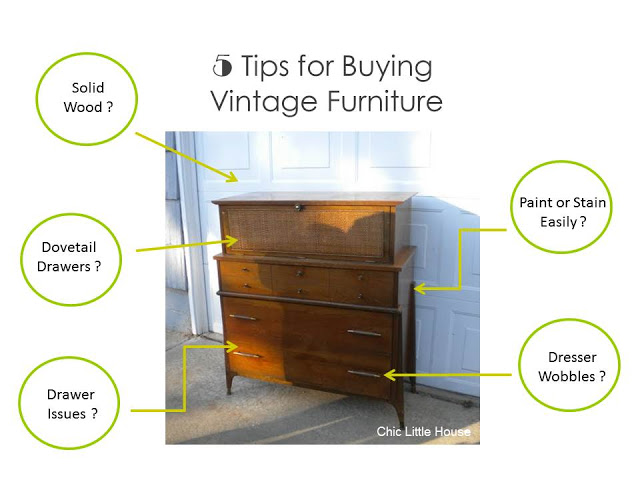
Remember my beloved Secretary desk I found via Craigslist last year, you can see it refinished here. Just in-case your wondering aside for bad smoke damage & discoloration we were able to salvage this piece and had is restored! We visited it a few weekends ago and I almost did a cartwheel in the work room it was SO good to see something I loved and put love into being restored. Before buying my secretary desk, I asked myself some questions. Below are my top five questions I always ask myself when buying a vintage dresser.
I thought no problem I'll just replace the top with a marble remnant and use it in the living room. Next I checked out the drawers, one wouldn't close all the way and two drawers wouldn't open. I convinced my self it was no biggie that only 2 drawers worked and one wouldn't close all the way!! Yup, I was ignoring my own rules. Thankfully Hasani was with me and made me realize, I was trying to hard to make this one work and we have time to find the right pieces for our home. My goal is to make sure we only buy pieces we love, and with the Craigslist dresser it was more of a dud than potential great piece. As the old saying goes looks can be deceiving.

Do you have any vintage furniture buying tips to share? Have you bought any vintage pieces that ended up being duds? What's your favorite find our Craigslist? Mine hands down is my secretary desk & my bedroom dresser.

Its taken me a a few trial and errors to know what a well made dresser really is. I thought I would share my tips after I recently came across a little dresser I loved on Craigslist, but only to realize in person it had issues. Even with its issues, it was tough for me to pass up. If you follow me on Instragram { @mrsclh } then you may have seen my picture of the dresser and read my disappointment. I'll get to more on that little dresser in a bit.
Remember my beloved Secretary desk I found via Craigslist last year, you can see it refinished here. Just in-case your wondering aside for bad smoke damage & discoloration we were able to salvage this piece and had is restored! We visited it a few weekends ago and I almost did a cartwheel in the work room it was SO good to see something I loved and put love into being restored. Before buying my secretary desk, I asked myself some questions. Below are my top five questions I always ask myself when buying a vintage dresser.
- Is It Solid Wood? I love finding solid wood dressers, to me if they are made well they will last forever. Solid wood is also more forgiving, you can use wood filler to fix gouges and sand down again to a smooth finish. You can also change sizes of drawer hardware easier with filler and paint.
- Can it be Painted or Stained Easily? If the dresser is solid wood, it makes it easier to paint, and change colors or sand it down and re-finish as needed.
- Drawer Issues? Whenever I'm looking at a dresser, I open and close all the drawers over and over to see if I spot any drawer issues. Drawers that don't close all the way, or open. Drawers that get stuck on the bottom or side tracks. It's also a good idea to consider removing the entire drawer from the dresser and see how easily it slides back into place, this is a good indication of quality. Remember your buying a dresser and using the drawers a lot they should open easily.
- Drawer Construction? My heart skips a beat when I come across dressers with dovetail drawers. According to the 'all knowing' Wikipedia the dovetail joint design pre-dates written history! DIY Translation: its built very solid and shows quality workmanship. You can read move about those joints here
- Does the Dresser Wobble? If the dresser is wobbly, I check to see how easy it will be to fix the dresser, maybe the legs are jusy a smidge uneven? Whenever I come across a dresser that seems unstable I give it a little shake, that helps tell me if there's a structural issue with the dresser, maybe a crack I can't see?
I thought no problem I'll just replace the top with a marble remnant and use it in the living room. Next I checked out the drawers, one wouldn't close all the way and two drawers wouldn't open. I convinced my self it was no biggie that only 2 drawers worked and one wouldn't close all the way!! Yup, I was ignoring my own rules. Thankfully Hasani was with me and made me realize, I was trying to hard to make this one work and we have time to find the right pieces for our home. My goal is to make sure we only buy pieces we love, and with the Craigslist dresser it was more of a dud than potential great piece. As the old saying goes looks can be deceiving.
Do you have any vintage furniture buying tips to share? Have you bought any vintage pieces that ended up being duds? What's your favorite find our Craigslist? Mine hands down is my secretary desk & my bedroom dresser.


