
Last week, I shared the fabrics I planned on using to make my son a baby blanket. I thought it would be fun to make a modern Chevron print blanket. I wanted the blanket to be cozy in the winter and fun to play on in the summer months. I wanted the blanket to be a nice size but not too big, so I did a little research on the net and found a happy size for the blanket 36 x 36. Making this blanket couldn't be easier, its actually the first blanket I've ever made. So picture me patting myself on the back. I only had one mishap during my sewing, I broke a needle, so did have to make a quick run to Wal-Mart for replacement needles. I cut my fabrics 37 x 37 and allowed for a 1/2 inch seam allowance on either side.
Next I pinned my fabrics with the Chevron and Minky facing each other. I used all purpose white sewing thread and worked my way around the blanket.


I left about a 6 inch gap, so I could easily turn the fabric inside out. Next I did a simple hand stitch and closed up the hole.


I wanted to give the blanket a more finished look, so I did a simple top stitch 1x on top of the chevron print. I am by no means an excellent sewer, so I just took my time keeping a straight line.

Here's the modern Chevron blanket, I made for my little baby boy. It's the perfect blanket for him to play on and for cooler evenings out. I love the Chevron print has many colors that all look so cute together.
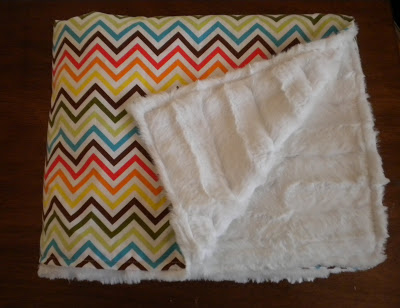


I love this blanket, and it was made on the cheap. The Minky fabric was only $ 4.54 for one yard and the Chevron was $ 8.98 - Total $ 13.52 plus I found a coupon online taking 10% off my purchases, so I spent around $ 12 bucks, not to shabby. I bought this fabric from Fabric.com
What do you think of the Modern Chevron Minky blanket I made?

Next I pinned my fabrics with the Chevron and Minky facing each other. I used all purpose white sewing thread and worked my way around the blanket.
I left about a 6 inch gap, so I could easily turn the fabric inside out. Next I did a simple hand stitch and closed up the hole.
I wanted to give the blanket a more finished look, so I did a simple top stitch 1x on top of the chevron print. I am by no means an excellent sewer, so I just took my time keeping a straight line.
Here's the modern Chevron blanket, I made for my little baby boy. It's the perfect blanket for him to play on and for cooler evenings out. I love the Chevron print has many colors that all look so cute together.
I held the blanket up against the nurseries new wall color Silver Drop and love how it looks in the room already.
I love this blanket, and it was made on the cheap. The Minky fabric was only $ 4.54 for one yard and the Chevron was $ 8.98 - Total $ 13.52 plus I found a coupon online taking 10% off my purchases, so I spent around $ 12 bucks, not to shabby. I bought this fabric from Fabric.com
What do you think of the Modern Chevron Minky blanket I made?


