Choosing a Stain for Our Hardwoods

Just a few days ago I shared our first official tour of house with the drywall up, read more about home tour

here

. Since sharing our tour, the drywall was been completely tapped and textured. 

In

case your a new reader to my blog, we lost the majority of our belongings and house due to a fire in July 2012 you can read more about the fire 

here

. We are now in the re-building stage and very grateful

 to rebuild our home

One thing I loved about our old walls was the texture, not rough not too smooth just right so we went that route again the finish is called imperfect smooth. It fits perfectly with our homes age. After the drywall was completed it was time to address our hardwood floors, just barely two years ago we refinished our floors DIY Style, read more about how we did our floors

here

We were hopeful that could 'save' some of the original hardwoods seam in new hardwood floors in our house as needed. It was really important that our new unfinished hardwoods were the same size and type of wood, as or existing ones so everything would be consistent and seamless. 

The 'flooring guys'

, installed new unfinished matching hardwoods in our kitchen & dining room, portions of our living room, hallways and bedrooms. The flooring guys did an amazing job of matching our old hardwoods with our new hardwoods. 

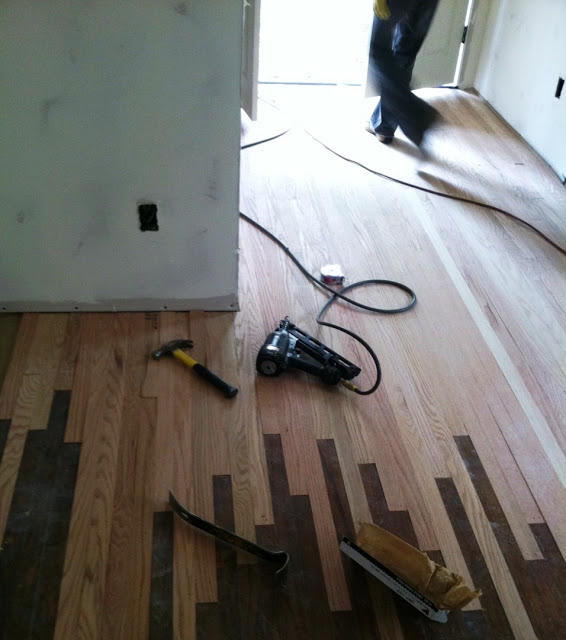
Our new unfinished oak hardwoods came all the way from Kentucky, from a company called

Lebanon Oak Flooring

. The company has been in business since the late 1800's. I love that our flooring comes from a company that's been around for a really really long time and has a history, just like our original hardwood flooring. 

When we refinished our hardwood floors almost two years ago we with the Minwax color

Early American

. We were pretty certain would go use the same color stain again, until we started looking at the color swatches. 

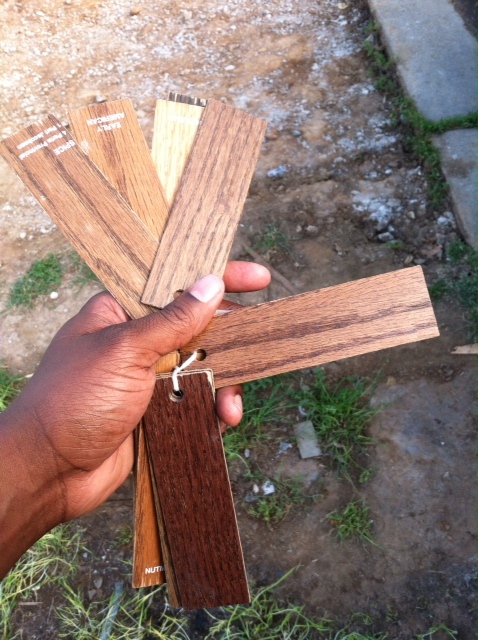
This time around Hasani was really drawn to Dark Walnut, but I really liked Jacobean  The only way to truly know which color will look best on your floors, is to test the stain on your hardwoods, because the sample swatch might look completely different on your floors depending on your wood, age of type etc. If you follow me on Instagram then your spoiled and got a sneak peak at the stain colors we were considering. My user name on Instragram is Mrsclh...hope to see you on there! 

Dark Walnut

: On our floors dark walnut was much lighter and had reddish brown undertones. In the sample swatch the color look more brown and showed less grain detail. 
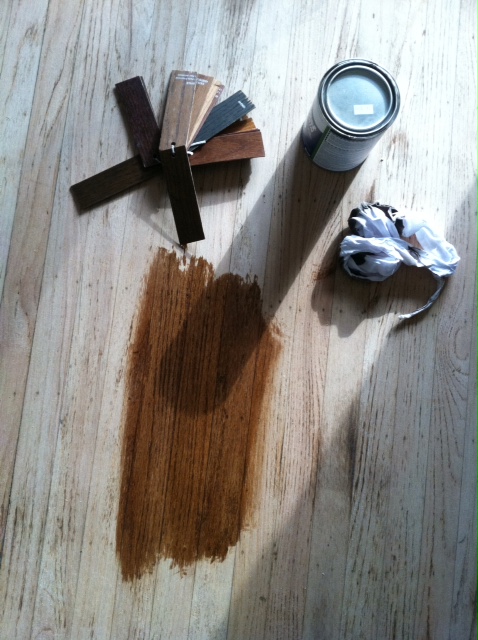
Jacobean

: Our on floors was a nice deep brown but not too dark and showed all the grain variations in our wo

od the showed a range of colors from light to dark.

 In the picture you can see how the stain isn't as dark on our hardwoods as it is on the swatch.

We looked at both colors side by side in natural light and full sunlight with the front door open & closed. We both agreed we loved how Jacobean looked, it showed all the pretty variations of the wood grain deeper and lighter in some areas. 

That's one the beauties of staining wood, seeing all the color variations and not getting one solid flat color. Yet the overall colors will look consistent

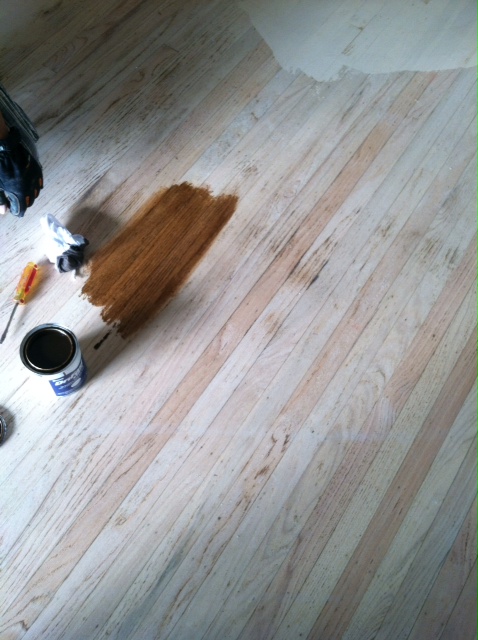
. After selecting our stain color, the 'floor guys' came back the next day to apply the stain. I'll share more details of the staining process the floors professional use & our floors of course! 

What stain colors do you like on hardwoods, lighter or darker? What to you think of the stain we choose?

Our Home Tour: Drywall Edition

I don't think I've ever really done a proper tour of our home all at once, so when I was at my mission to snap a bunch of pictures and share with you all our blank slate home tour. 

Drywall was hung a week of so ago and since taking these pictures, the seams have been taped and they are starting texture this week. I'll share updated pictures of the house after its been painted. Here's the view a portion of our living room looking into it from the dining room / kitchen. I love all the natural light our home gets it really feels up the space. We also added four pot lights to our room in addition to the main center light. Good lighting is important! 

** I'm having a loading issue with blogger, some pictures only wanted to remain sideways. due to this issue I'm unable to share pictures of better angles and some rooms. I will update when I can **

Here's our kitchen, its hard to tell in this picture but its was actually smaller before than it is now. Before it was an 'L' Shape kitchen with cabinets under the window then stopping midway on the back wall, our fridge used to float on the wall across from the window. We changed up our floor plan and were able to get rid of a strange bump out in our kitchen (before removing a hallway coat closet) Our kitchen layout will now be a 'U' shape, I can't wait to share more details of our kitchen. Click

here

to see how I'm picturing our kitchen and how this exact space looking a few weeks ago. The lighting in our kitchen is now a great balance for a room this size, we have four pot lights and one light above our sink, and also wired for under cabinet lighting! Hello Happy lighting changes! 

This is the view of our dining room, really eat in kitchen, but hey its my house so I can rename rooms if I want to! On the left is the opening to our living room we which doubled, before the opening was super small. Now the flow of our house feels much better and more open but now too open. On the right the is the doorway which leads to our laundry room / mudroom. Read more about my ideas for the space

here

. Another change we made to this room was adding more outlets and more the light  fixture so its centered in the room, before the lighting always too close to the window, throwing the balance of the room off. 

Here's another view of the same space looking in for the new wide doorway in our living room. Again our space is small, but it will be big on style! 

Here's our main bathroom aka the Boys bathroom / Guest Bathroom. The space actually looks bigger in person and thanks a few changes we've made to the layout it is bigger. Remember the 'bump up' I talked about in our kitchen, well it also bumped out into our bathroom. Allowing for only a 24 inch vanity! By removing the closet & swamping the vanity and toilet positions we can now fit up to a 60 inch! Counter and storage space are awesome, and I'm excited! lol 

Avery's room, so wish I could share more pictures with you (stupid blogger) ! Trust me his twin windows looking darling in the space! The door on the left is his new closet, it once at double sliding doors which I loathe. Since the closet is small a reach in type closet we opted to put a single door instead. 

Here's our bedroom, our room also gets great lighting!

This will be french door view! On the left of the french doors is our master closet on the opposite side is our master bathroom. The space between the bathroom & closet is nice and wide. We could easily fit a chair / bookcases in the space so many possibilities! I can already picture Avery playing in the little space and looking out our french doors.

Another view of our bedroom on the opposite wall is our new bedroom! Our bedroom feels so good in person and I can't wait to share more pictures once its 'more finished' and making more sense! 

There's our little house we adore and miss so much! I'm hoping to upload more pictures of our home once blogger decides to cooperate with me! 

What do you think so far? Any questions?