Dining Room Update: Mid Century Modern Lighting

A few months ago, I updated our living room light fixture. Our new living room like looks and feels so good! I’ve noticed over the years, sometimes the smallest updates have the most impact! While looking for the new living light, I stumbled across the perfect light fixture for our dining room. I’m going to be completely honest, the old light fixture we had a was perfectly fine, just a simple drum shade and I’m a huge fan of that lighting style. However, when I spotted this light, I knew it was meant to be a was a must!! Believe it or not, I found both of these lights on Amazon! Even better both lights were under $ 150 each! But first, here’s a reminder of how our dining room with the old light fixture.

Dining Room Light Before

IMG_6945.jpg
IMG_7002.jpg

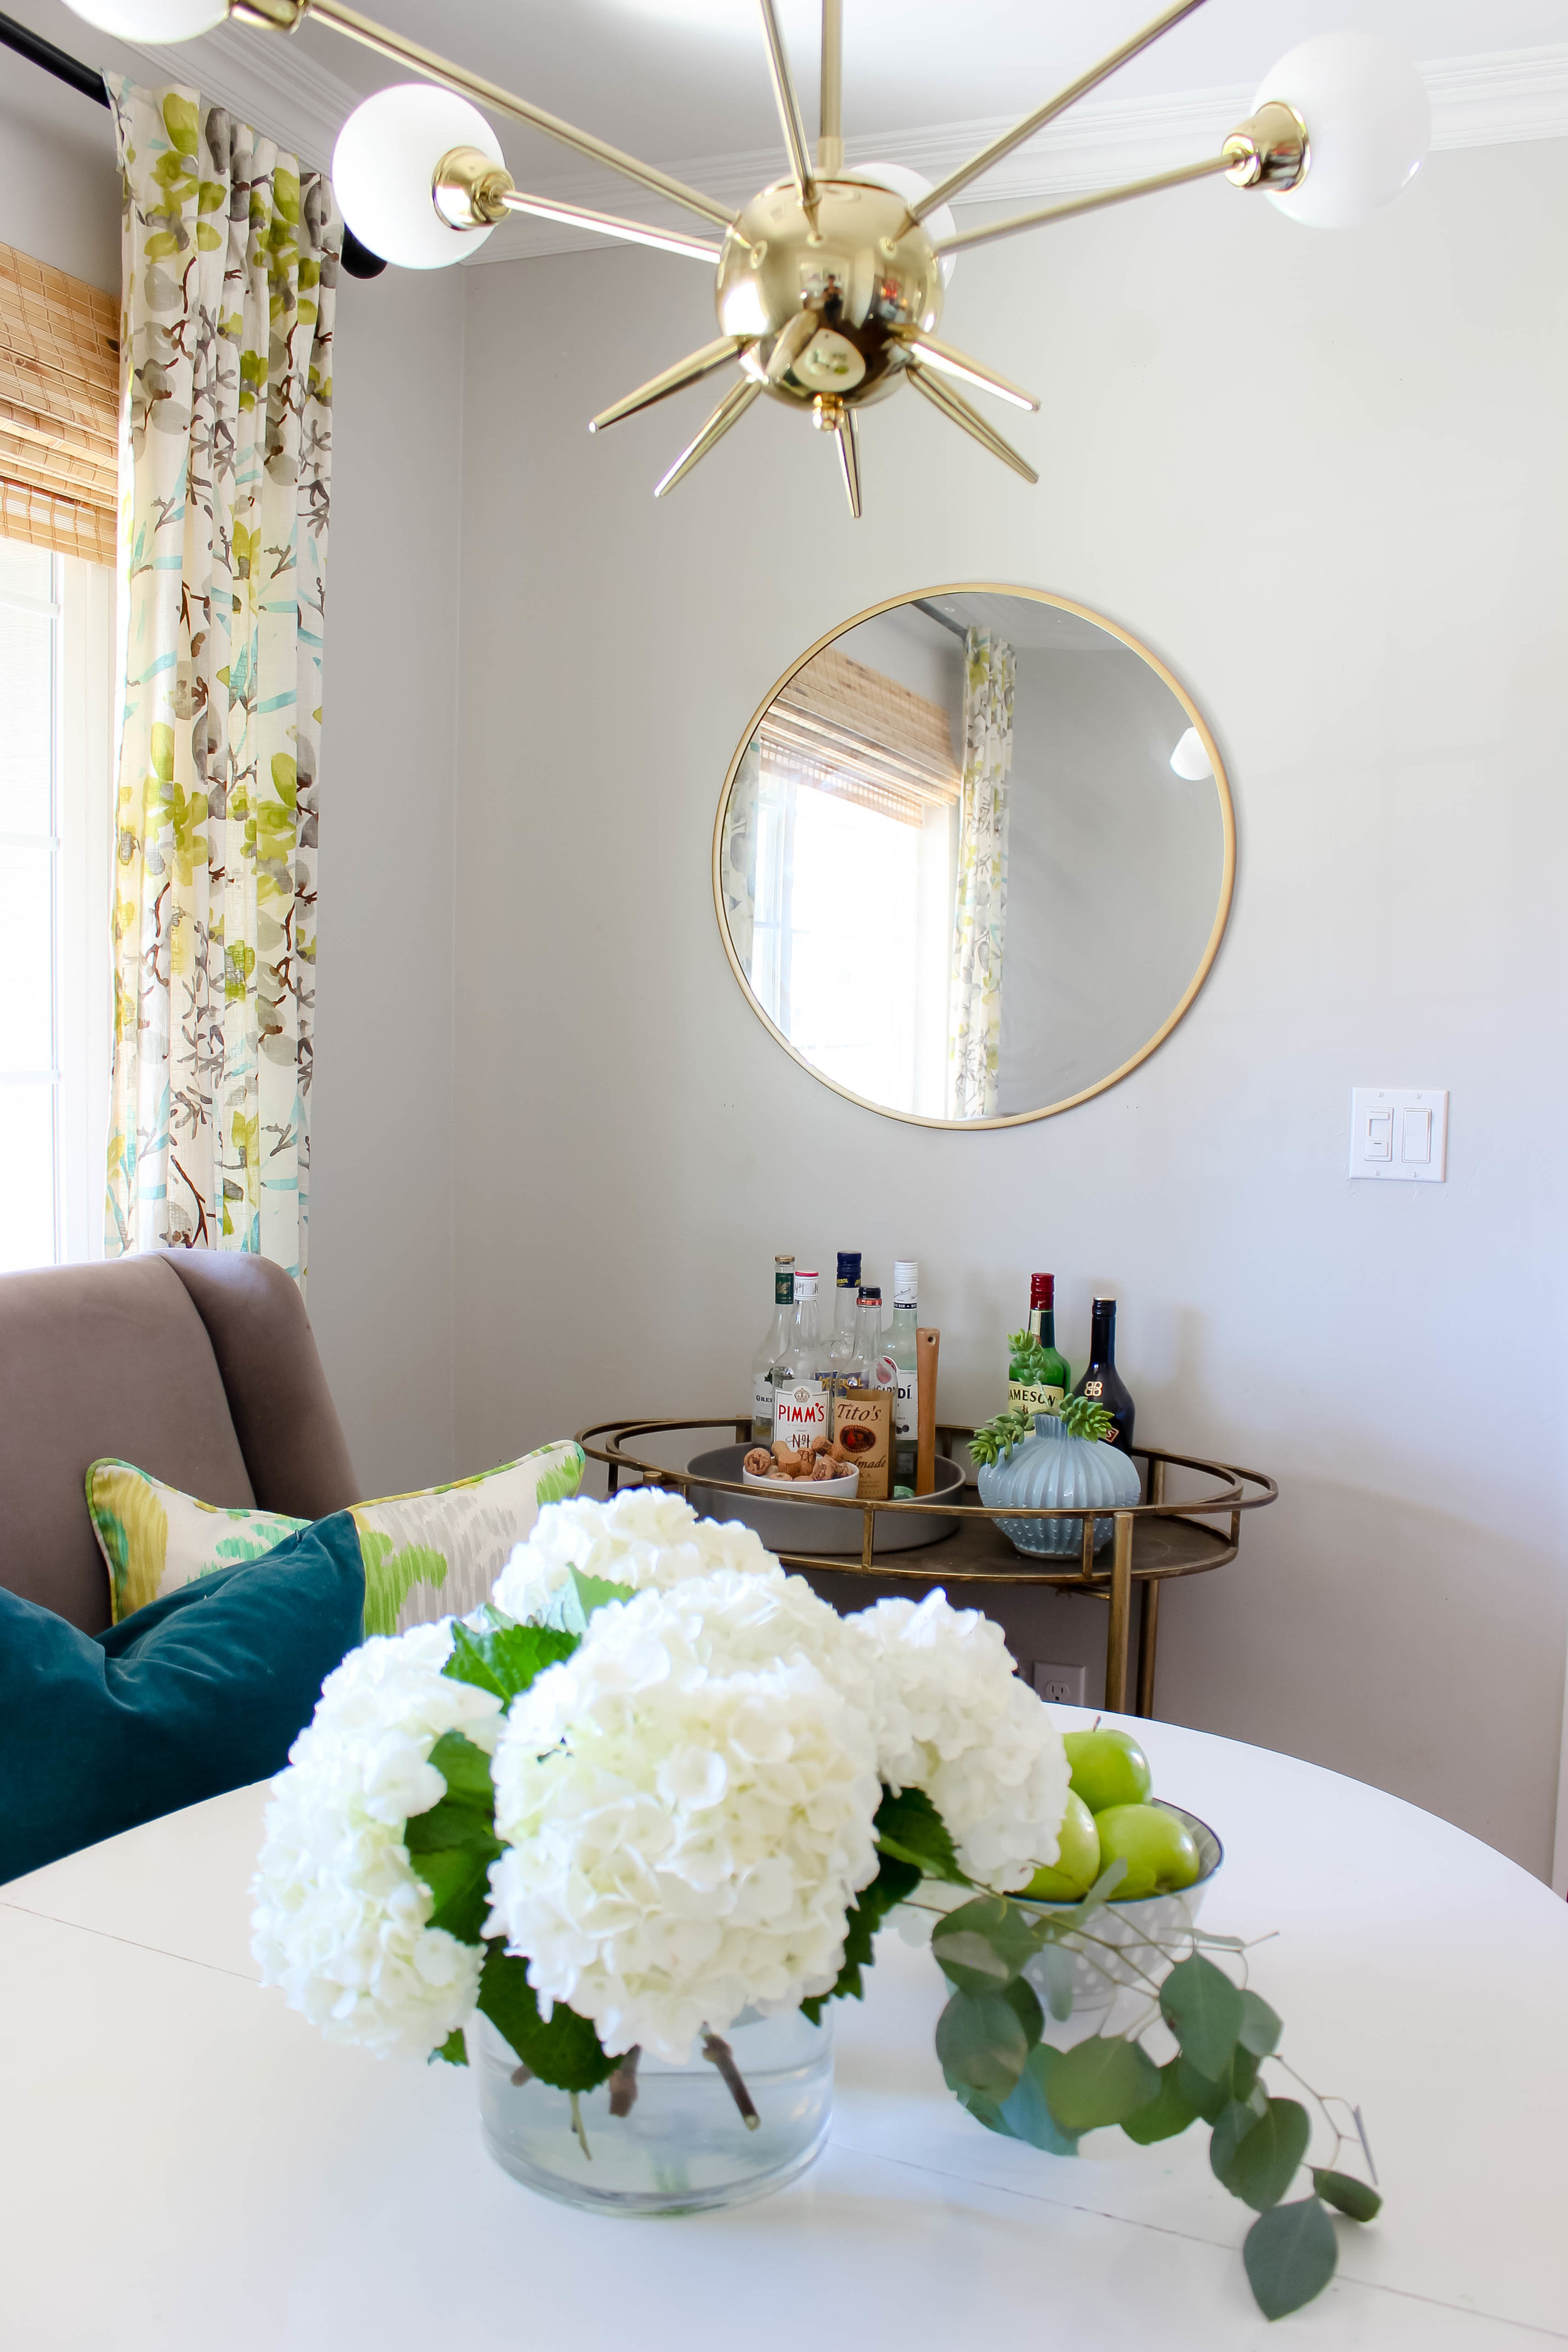
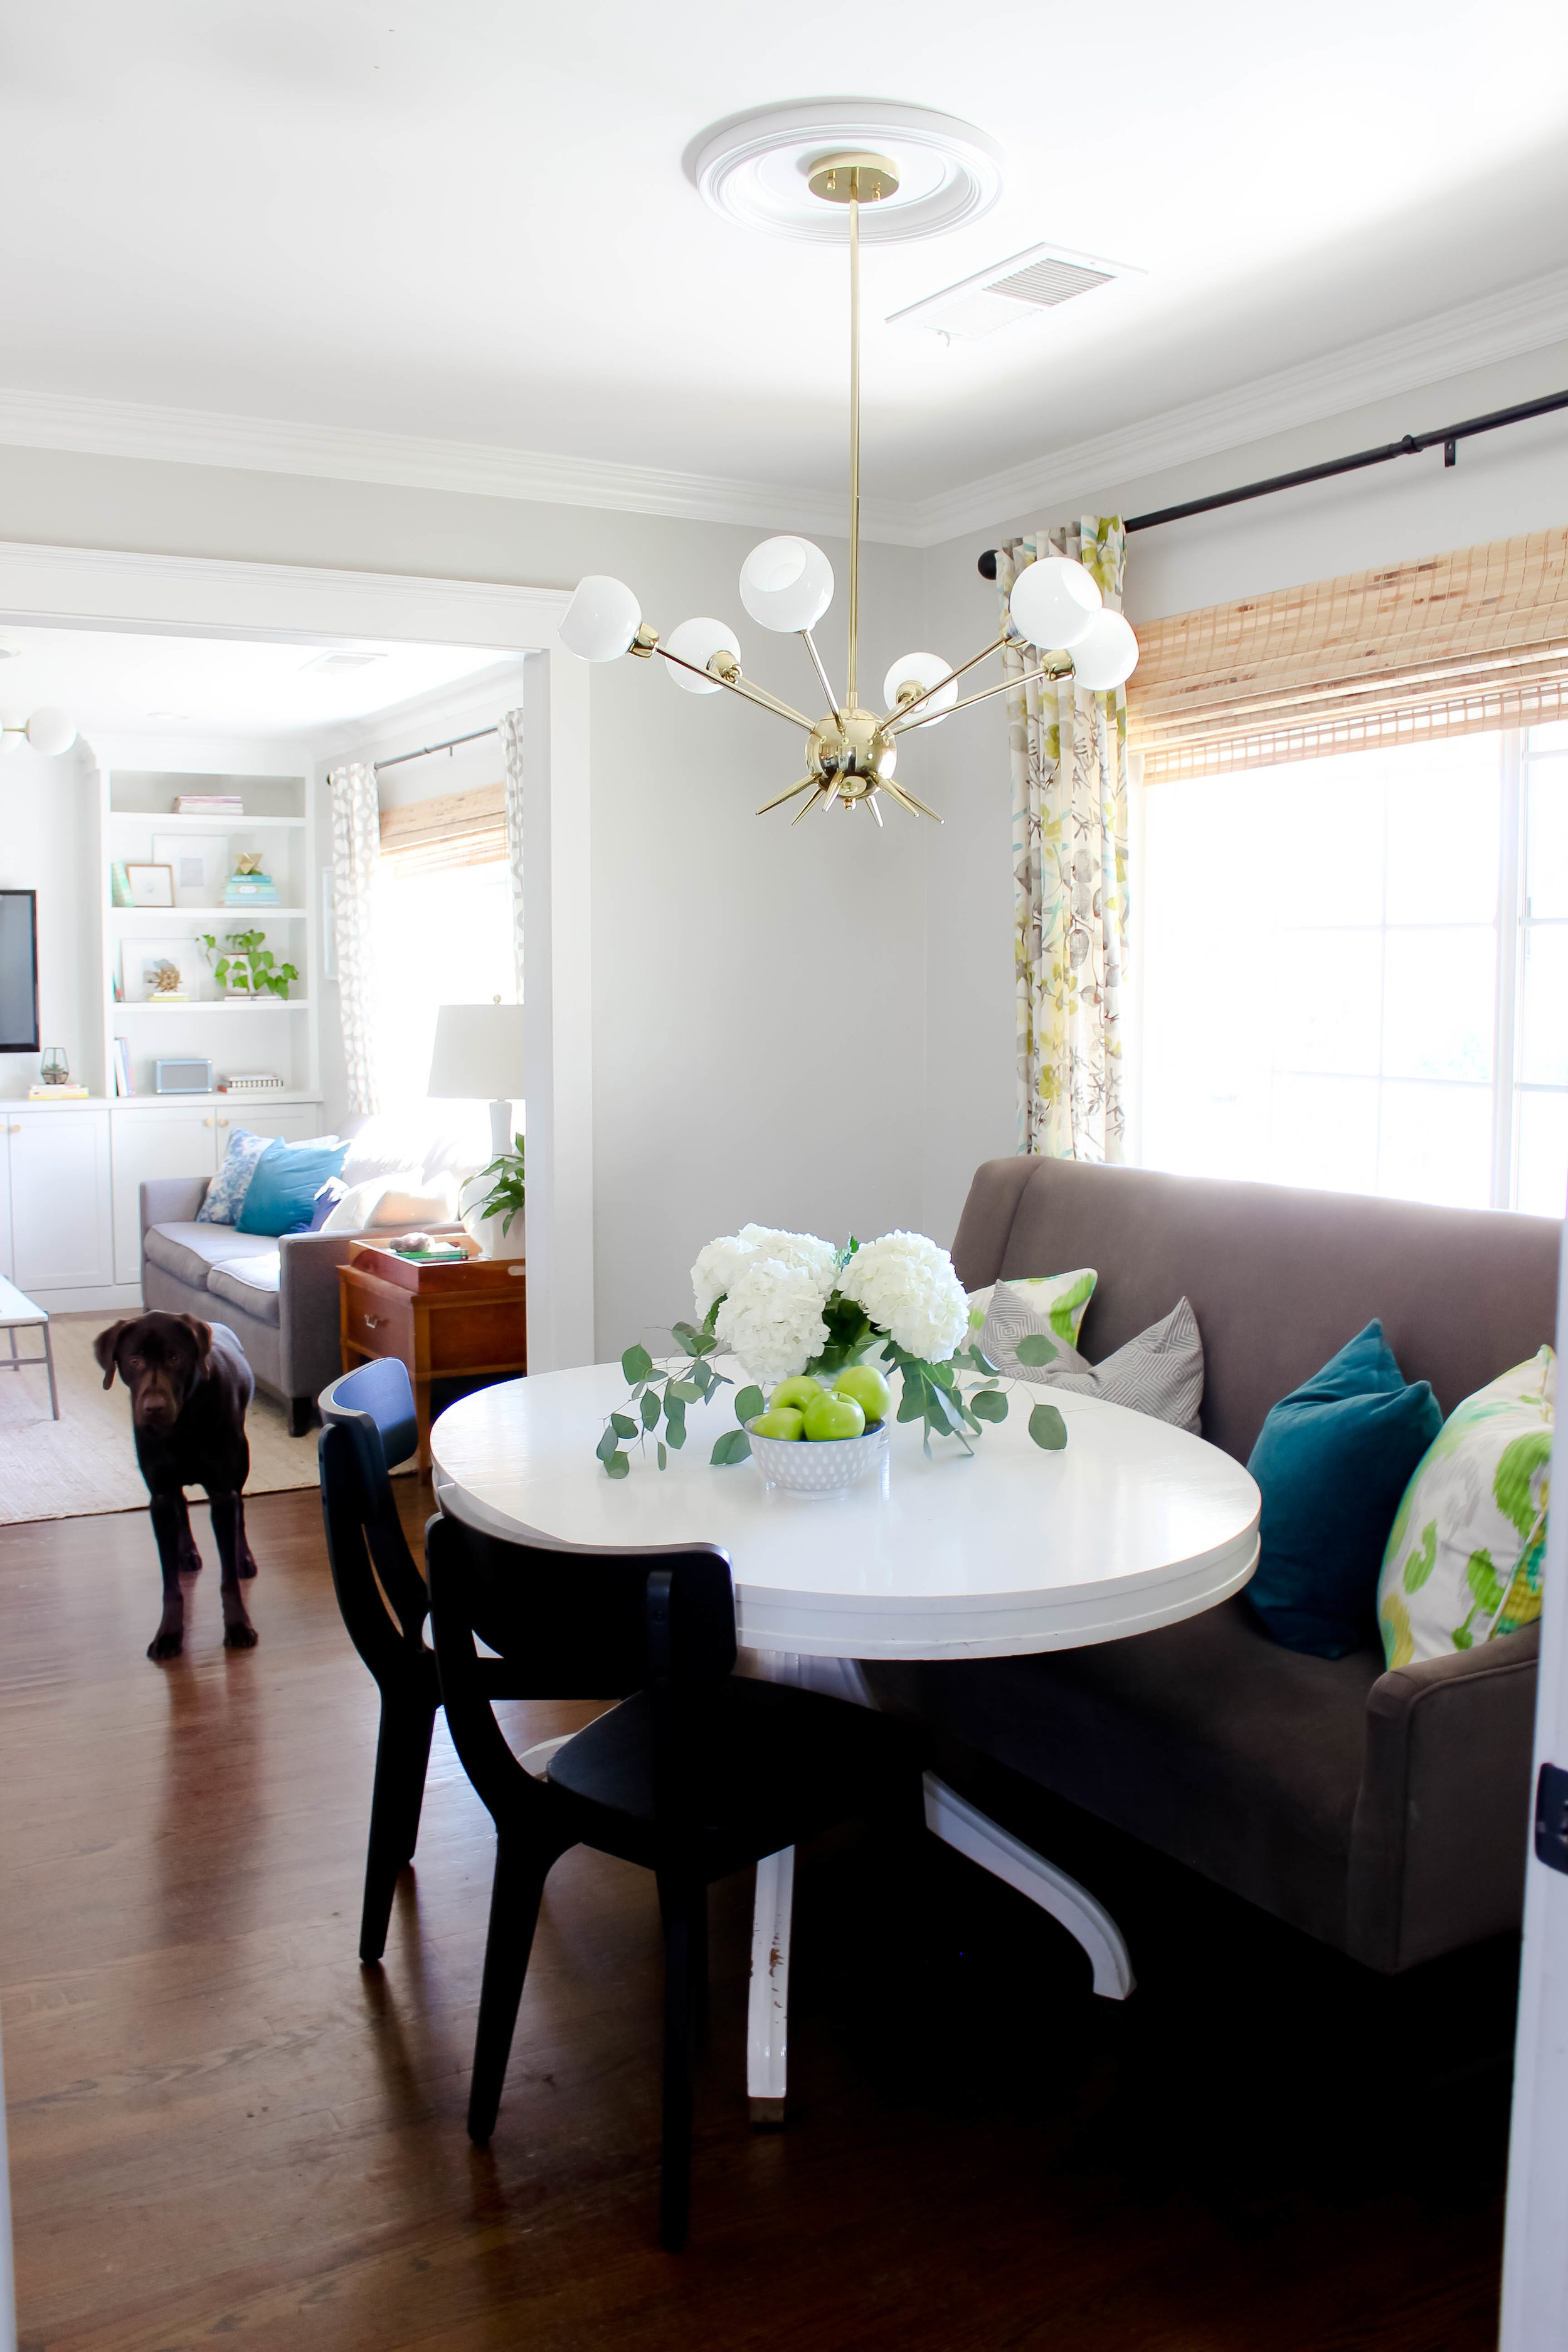
This is our dining room now, so much better right! For our dining room, I went with a six light Sputnik Vintage pendant, I love this light it's so pretty, the arms can be positioned either up or down. Since we have 8-feet ceilings, I opted to use two down-rods with the arm lights placed in the up position. I love how both the Sputnik Vintage pendant in my dining room pairs with the Grammercy Light Pendant in my living room. Both of the lights compliment each other a give a nod to my houses 1950’s Mid Century Modern roots.

Dining Room Light Now

IMG_7732.jpg
IMG_7724.jpg

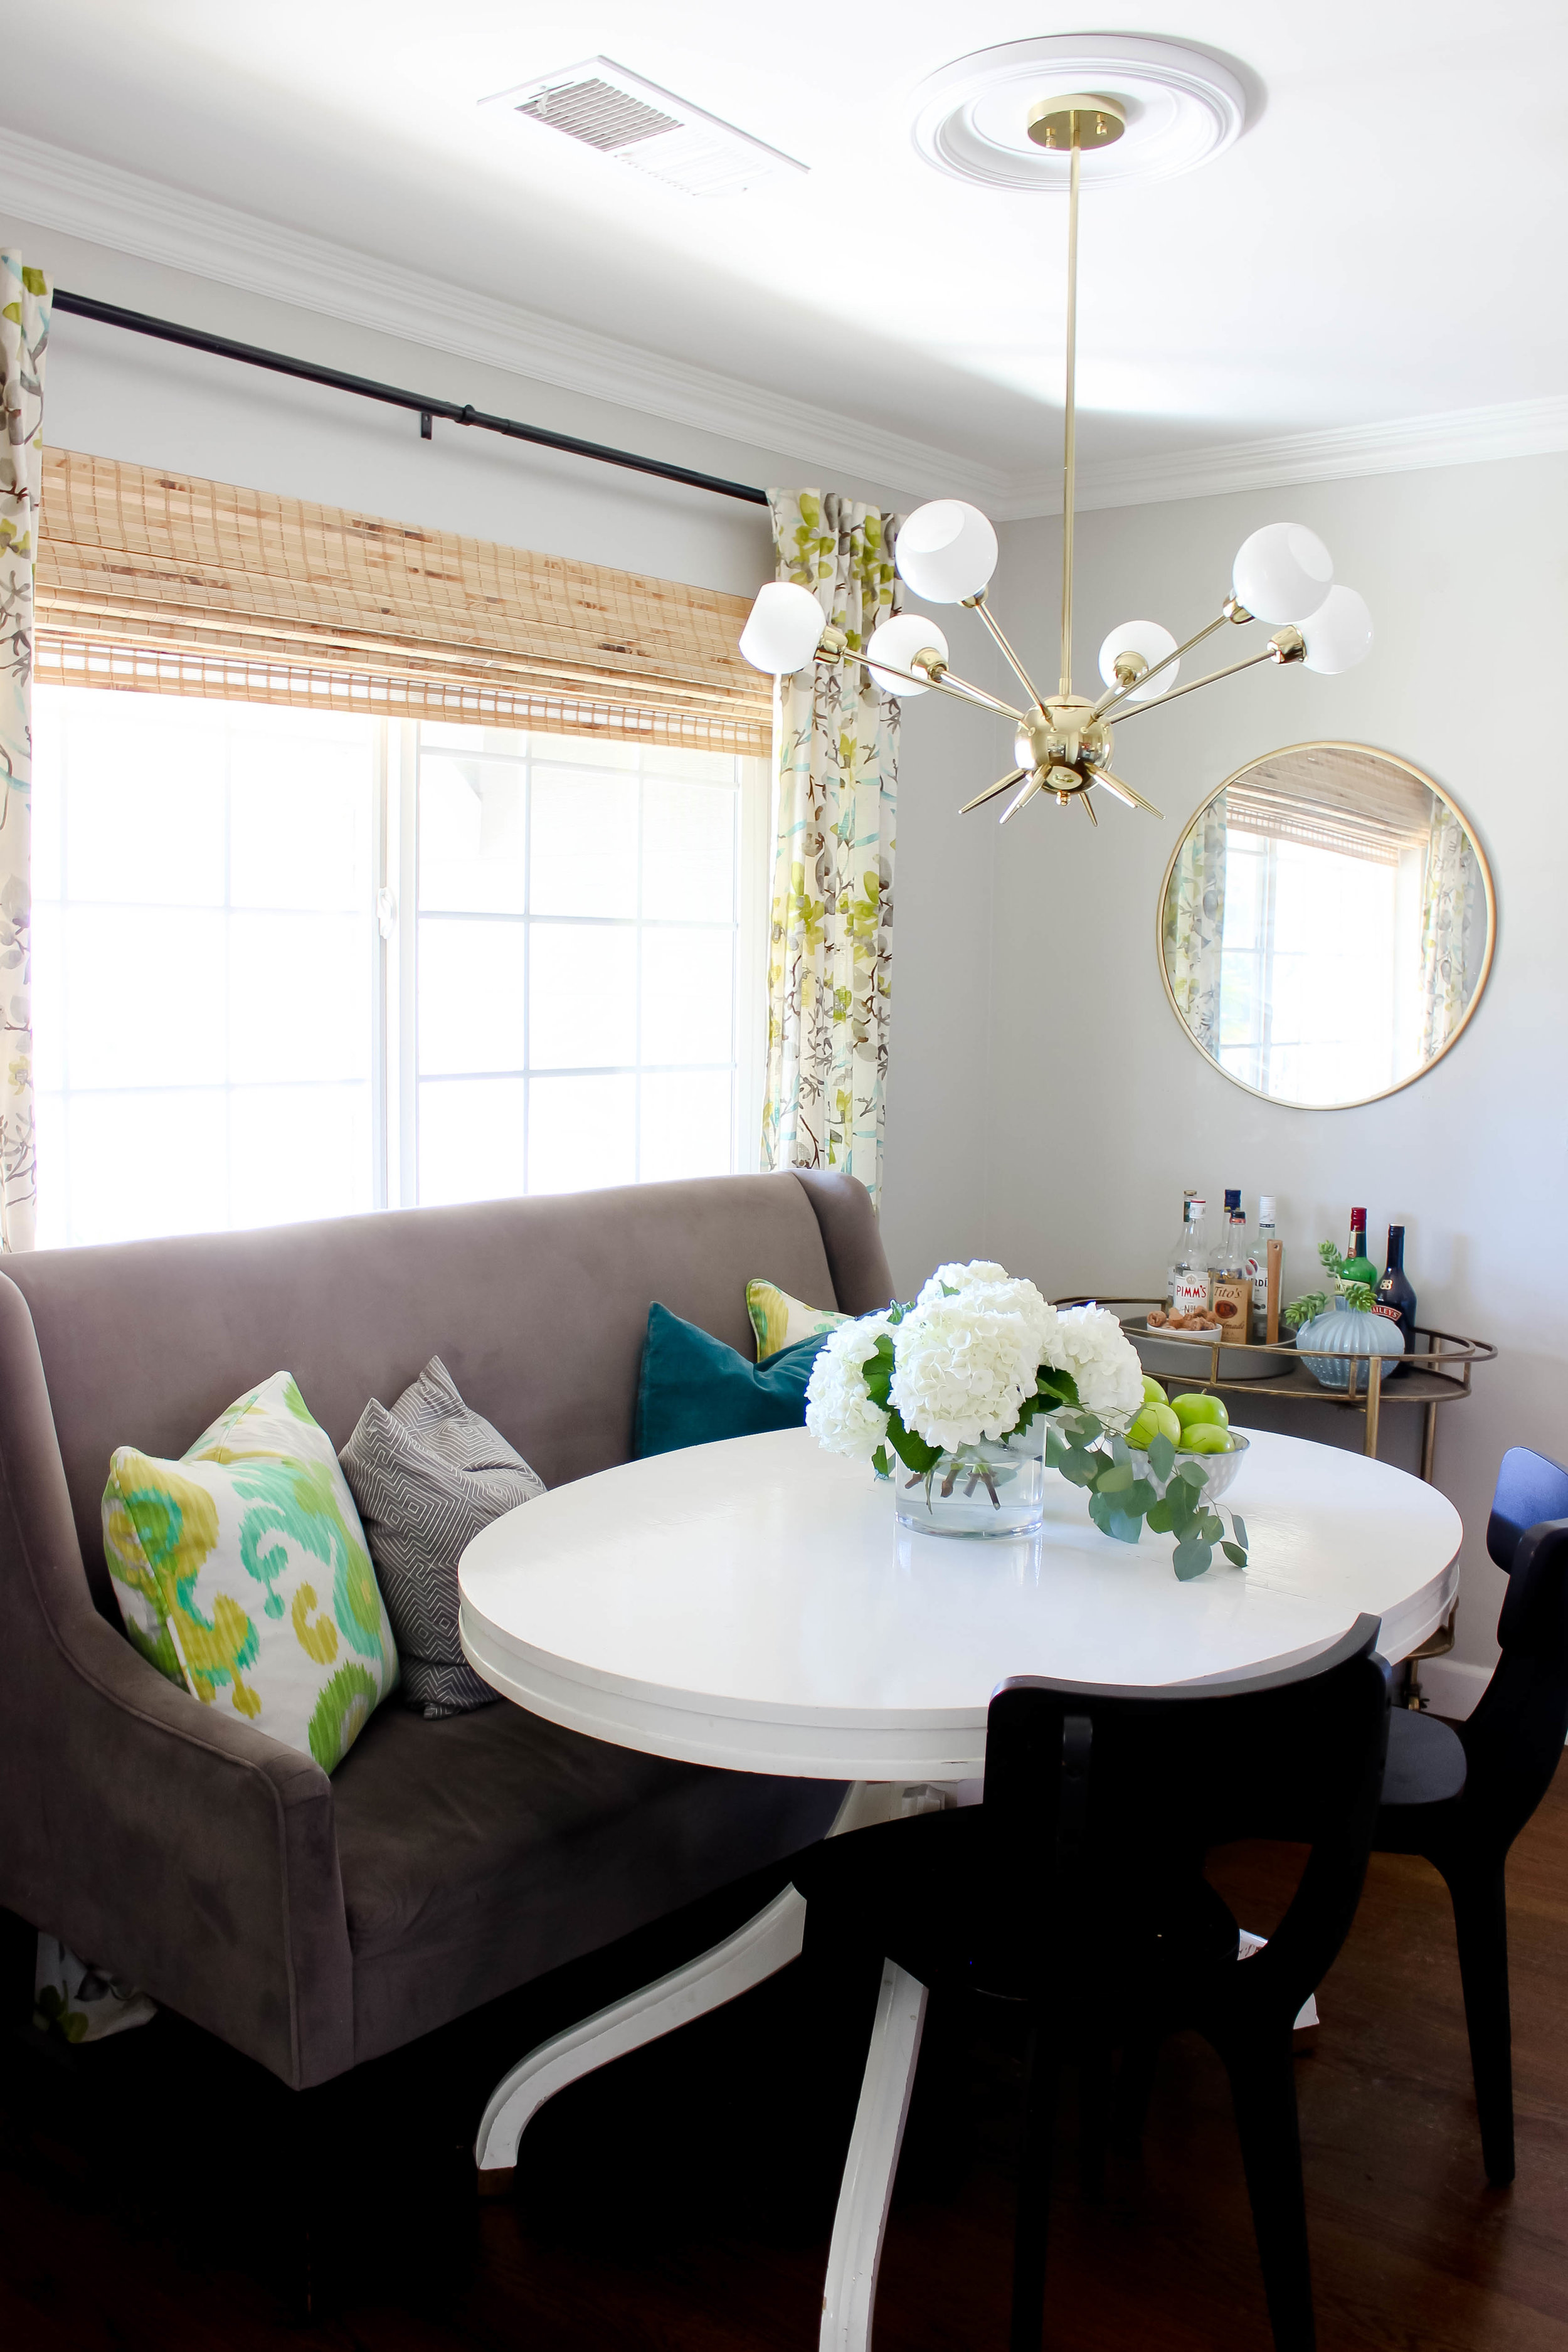
The light fixture came in several pieces and as a huge pain in the but to put together, but once it was it was totally worth it. I used simple non-LED chandelier style lights bulbs and I’m happy to report the lighting in my dining room is bright and even. We have this light fixture on a dimmer switch, which really all center overhead light fixtures should be in dimmers.

To give the light more presence in our dining room, I added a ceiling medallion. They’re simple and affordable and adds visual interest. I used the same simple ceiling medallion I used in my living room. I love cohesive my living room and dining room lights are, they both add impact, don’t blend in the background and give off those MCM vibes, I love so much.

IMG_7741.jpg


Get The Look

I love how this dining room light update turned out, and I see a few more changes happening in here of the next few months. Namely new artwork, new drapes and I’m toying with the idea of replacing our freestanding banquette seating with a built-in option that includes hidden storage.

What do you think of our new dining room light? Doesn’t it feel right at home within my 1950’s rancher?

Small Master Bedroom Closet Makeover | Building Our IKEA Pax Closet

A few weeks ago, I shared our plans to give our closet a complete overhaul, and tear out the old non-functioning closet and install an IKEA PAX Closet. The Friday before New Year’s Eve, we headed to IKEA with our shopping list in hand and brought home roughly 30+ flat pack boxes which as thrilling and crazy, know that inside each box contained an IKEA puzzle! Our Sacramento IKEA is set-up where you create a shopping list online with all the items you need for your closet, and then head to the store and see a sales associate and they print you out an order number and list and then take it to the cashier to purchase and then pick up the items. The process was so smooth and a huge timesaver! We didn’t have to pull any items ourselves, everything was perfectly loaded up, and this feature was free! I think we waited about 15 mins to receive our items. I’m not sure how other IKEA Store is set-up, but from reading lots of blog posts about the process, it seems that you pull your items from the colossal warehouse.

OUR IKEA PAX HAUL

I was so excited to get home and tear everything out! But, we still had a closet full of miscellaneous crap that needed to be sorted and tossed. Over time our closet became a dumping ground for stuff, a place to stash things. I used to open the door and full-on cringe. The closet gave me anxiety, and for the longest time, I felt stuck. Like there would never be a solution. After looking for closet options, I quickly landed on the IKEA PAX closet; I loved the design style of the PAX, how customizable each unit can be and its affordable price point. With some planning, I knew we could maximize our small closet and get the most bang for our buck!

Read more about the design process for our closet here.

Building Our PAX Closet

After removing all the stuff from our closet, we got to work. We wanted the units to fit flush to our walls, so we removed the baseboards and set them aside.

Seeing our closet empty felt incredible and exciting! As you can see in the photos below, we were totally under-utilizing our space.

IMG_1986.jpg

We stored all the IKEA PAX boxes in our garage and only brought in one box at a time; this helped from feeling overwhelmed with the number of boxes. We gathered our tools and got to work building the small cabinets first. We followed the directions and quickly realized due to space on constraints it made more sense to build the cabinets standing up. Without a doubt, the building of the PAX closet is a two person, sometimes three person job! Some parts of the process can be done alone, for example, I built all the drawers myself while watching TV.

IMG_2031.jpg

Tips on Building IKEA PAX Closets

  • Follow the directions closely and take your time!

  • Build the smallest PAX frame first; it will help when you tackle the larger sizes

  • Determine if the unit should be built laying down or standing up

  • When installing drawers in the units, start from the bottom up, it makes the process easier

Overall it took us around three days to build the frames; we had family in town on New Years weekend, so we never had a chance to dedicate an entire day to building. After we built each unit was built, we placed the frame in place. Building Our PAX Closet

After removing all the stuff from our closet, we got to work. We wanted the units to fit flush to our walls, so we removed the baseboards and set them aside. We stored all the IKEA pax boxes in our garage and only brought in one box at a time; this helped from feeling overwhelmed with the number of boxes. We gathered our tools and got to work building the small cabinets first. We followed the directions and quickly realized due to space on constraints it made more sense to build the cabinets standing up. Without a doubt, the building of the pax closet is a two person, sometimes three person job! Some parts of the process can be done alone, for example, I built all the drawers myself while watching TV.

After getting the units fully installed, I re-painted the inside of the closet. Giving the closet a nice freshening up.

OUR IKEA PAX CLOSET INSTALLED

I’m so happy with how our closet is coming together, the drawers and shelves were super simple to install. We learned when installing the drawers, its best to start from the bottom and work your way up. As a reminder, Hasani prefers to hang most of his clothes, in his PAX unit we installed double rods. He has an upper shelf for hats and sweaters. His smaller cabinet has four drawers and four shelves, giving him ample storage.

IMG_8345.jpg
IMG_8348.jpg

My IKEA PAX side. I have four drawers in my larger unit and a pull out drawer for accessories and one hanging rod. My plan is to fold most of my clothing. My small has three shelves for my shoes and one hanging rod for coats and dresses.

IMG_8344.jpg
IMG_8346.jpg

We’re nearing the home stretch and a few items on our list to check off, below is what’s left on our project list.

  • Install Baseboards

  • Replace light fixture with something fun, maybe a sputnik light?

  • Find storage cubes for open shelves

  • Find a full length mirror for back wall in the closet, I really want get dressed in our closet so a full length mirror is a must. I like this one from Target

  • Add organizers in my top drawer where my under garments will reside, so everything stays nice and tidy

While its tempting to fill our closer right back-up, we want to be thoughtful about how we organize it and make sure the clothes we keep, ‘spark joy’ Did you notice my reference to the new Netflix Show Tidying Up? I have her book, pretty much skimmed through it. But thanks to the TV, her method totally clicked, when it came to going through our clothes once again! We’re slowly in the process of putting our clothing back into our closet.

In the next couple of weeks, I up to share our master bedroom closet reveal! It totally feels like a brand new space. I’m loving all the storage we have and how much space we have! What do you think our closet makeover so far?