BBQ Carnitas Nachos

Right now in Northern California and pretty much everywhere in American its grilling season. This is the time of the year Hasani loves to grill. He grills, ribs (pork & beef) hot links, hot dogs, burgers. I love when he grills too :) He's gotten so so good over the past couple of years. just in case your curious his grill is charcoal. The other weekend we thinking about dinner early, when I suggested we grill nachos on the grill. i'm not a big steak person, so I suggested we make the nachos with pork, and turn the pork into Carnitas ( I love Carnitas!!) For all you newbies out that haven't had Carnitas before, here's the definition of 'Carnitas, literally "little meats," is a type of braised or roasted (often after first being fried) pork in Mexican cuisine


BBQ Carnitas Nachos


Slow Cooker Carnitas

I wanted the Carnitas to be tender and tasty, I looked online and found a great slow cooker Carnitas Recipe of Epicurious, click here for the recipe. 

2 pounds boneless country-style pork ribs or pork shoulder (Boston butt)
2 teaspoons salt { I used Kosher }
2 teaspoons ground black pepper
2 teaspoons dried oregano (preferably Mexican)
1/2 large onion, cut into 4 pieces
Fresh cilantro sprigs
1/2 Cup of Water or Chicken Broth

Place the meat in the slower cooker, and then add all ingredients and cover. Fully cooker between 4-6 hours on high. It took about 4 hours on high to cook the Carnitas in our slow cooker. After the pork is cooked, shred the meat. The meat should shred really easy. I like mine a little crispy. So we fried them lightly in Extra Virgin Olive Oil { a little oil on the bottom of the pan } until a little crispy

Making Nachos

I prefer using restaurant style tortilla chips, they just taste better. At our local International Market, you can buy a huge bag of freshly made tortilla chips for $1.99. We used our metal BBQ grill basket similar to this one to grill our Nachos in. 

1 Bag of Tortilla Chips
1 Cup of Cheddar Cheese
1 Cup of Monterrey Jack
Fresh Cilantro Sprigs
1 Large Tomato
1 Large Avacado
1 Cup of Sour Cream
1 Can of Re-fried Beans or Black Beans (cook on stove top)
Your Favorite Salsa 

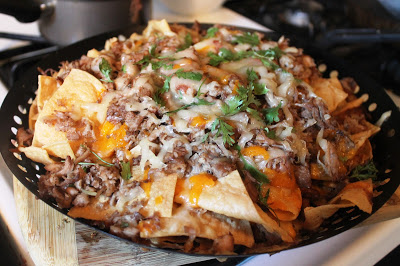
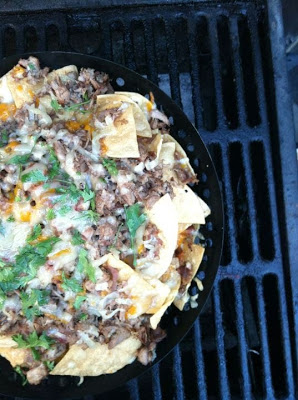
Layer the bottom of the your grill pan with chips, beans, then Carnitas and cheese. Keep layering the chips, beans, meat and cheese. Finally top your nachos with Cilantro. Next carry your precious cargo outside to your already hot grill, place inside your hot grill until the cheese is melted and they tortilla chips looked crisp { about 10-15 mins } Resist the urge to start eating the nachos while still on the grill. 

These Nachos are perfect for parties and sharing with a group. Top with your favorite toppings. our are Avocado, Sour Cream, Southwestern Style Salsa & diced tomato. These nachos were freaking amazing!!! Like super Yumm!!! I loved the smokey flavor the BBQ gave the meat...yumm


Have you even BBQ nachos? What's your favorite food to eat grilled? Do you prefer Gas or Charcoal?  

Photobucket

Honey, There Goes the Counters

So its official my house is down a sink. I'm now skinless in my kitchen, oh and I have no counters. It's crazy, Sunday morning I woke up to me new reality of being sink and counter free. But let's back up a bit to Sat afternoon, demo time. As you know we are getting new counters! In an effort to keep costs down, we decided to DIY the old counter tops and backslash ourselves. Here's a reminder of how our kitchen looks pre-demo. 

I hope from this picture you can see our kitchen has good bones, tall cabinets that go all the way to the ceiling and they're solid wood which is a plus. We have big plans for our tiny kitchen, on a tiny budget! As with most of our DIY projects we've done over the years we plan on DIYing most of it, and getting help from the Professionals along the way { counters installed, electrical }   Here's my quick rundown of our plan, I will do an in-depth one very soon, since our old plan is dated. We are re-placing our the outdated tile counters with solid surface counters, new stainless steel sink, updating the back splash with subway tile, adding hardware and installing a vent hood. Currently we have an outdated ceiling vent, think old school ceiling vent. Not cute, freaking odd. We also plan on installing a pantry cabinet, again more on that in my kitchen post. Also new lighting, and paint lots of paint { cabinets, walls } Oh and new appliances, one at a time. 


Now back D-E-M-O. For anyone planning on removing old tile counter and a back splash I put together a How To. 


Supplies & Tools Needed


Face Mask
Safety Glasses 
Trash Bin
Broom
Heavy Metal Dust Pan
Crowbar
Hammer
Chisel 
Flat head screwdriver


After putting our safety glass and masks on, safety first! First we removed the old light switch / plug covers, then got down business. We started popping off the front of the tile using the nail mover part of the hammer. The popped off pretty easy. Once the corners were off, we were able to see how they attached the tile to the.


Not sure if you can tell in the picture above, but in the past tiles must have broken off because they where glued back on, not a good look. 


Then Hasani used the crowbar to pull up the top layer, the top layer was cement board. Using this technique we were able to remove a large layer of our old tile counters quickly.


While Hasani was working on removing the counters, I started working on the back splash. I used a metal chisel, we bought a long time ago to tear up our old tile floor in our kitchen and dining room. I placed the chisel underneath the tile and then hit the chisel with the hammer. The tile popped off one, two at a time.


After the dishwasher side was finished, we moved on to the other side of our small kitchen. Apply the same method, this side proved to be more messy. Lastly we removed the heavy old ceramic sink, good riddance to that sink!


Altogether it took about 2-3 hours to remove our old counter and back splash and plywood underneath the tile board. We cleaned as we went, making everything less messy and dusty. Here's my kitchen now, minus the old white tile with icky brown grout, minus our old fugly sink. We are making progress! I should mention in the pictures below, our stove is pushed way out of the area, we just wanted to make sure our fabricator / installer had easy access to our counters on both sides. After our kitchen demo, I placed my dinnerware back inside my cabinet for safe keeping.


Yesterday we had our counters measured for the template! We really like our fabricator / installer. He was very friendly and helpful and answered all of our questions! He also has a quick turn around time,we should get a phone call next week for a date to schedule our counters being installed!! After our install, I'll share our the cost breakdown and of course the after pictures! After the counters are installed, we'll be removing the old drywall and hanging new drywall. Since we plan on tiling we want a smooth surface as possible.

What do you think so far? Doesn't my kitchen look so much brighter with out the dark grout messing it up? Oh, I can't wait for paint and tile :)

Have to Demo-ed tile before, any helpful tips?

Photobucket